Gluten-Free Healthy-ish Pop Tarts - A new kid-favorite
Did you ever eat pop tarts as a kid? Maybe you were able to occasionally talk your mom into buying them. They aren't the healthiest choice, so you probably didn't get them often. But what if you could have the delectable fruity, frosted pop tart treat with the colorful sprinkles you loved as a kid, and didn't have to compromise your health as a result? That's exactly why we created these Gluten-Free Healthy-ish Pop Tarts. We say "healthy-ish" because there is still a little sugar in them, but nothing compared to the brand name counterpart! Our recipe is gluten-free, vegan, and super delicious! Paired with nutritious sides, you can enjoy a complete breakfast on the go that won't sabotage your health goals.

You'll love this homemade and healhty-ish twist on classic Pop Tarts! Bonus: On their own, these "pop tarts" are gluten-free, vegan, and totally delicious - and when combined with simple sides, they make for a great grab-'n-go breakfast, too!
How long will Gluten-Free Healthy-ish Pop Tarts last?
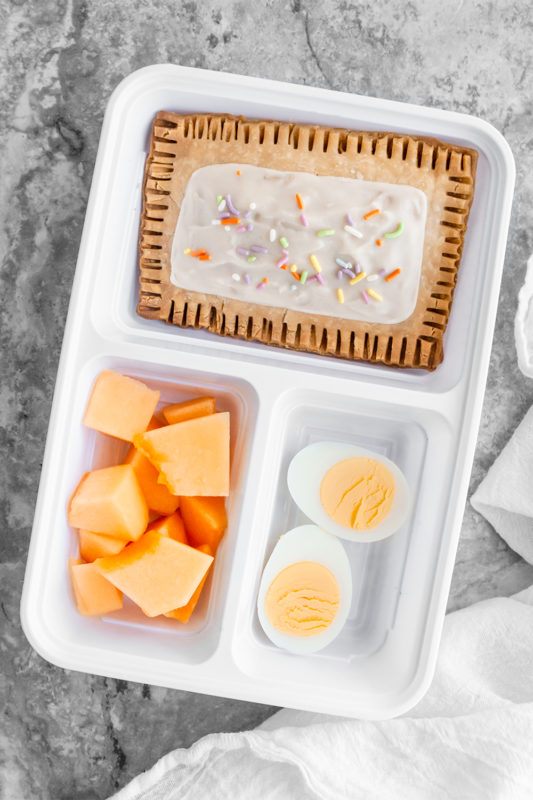
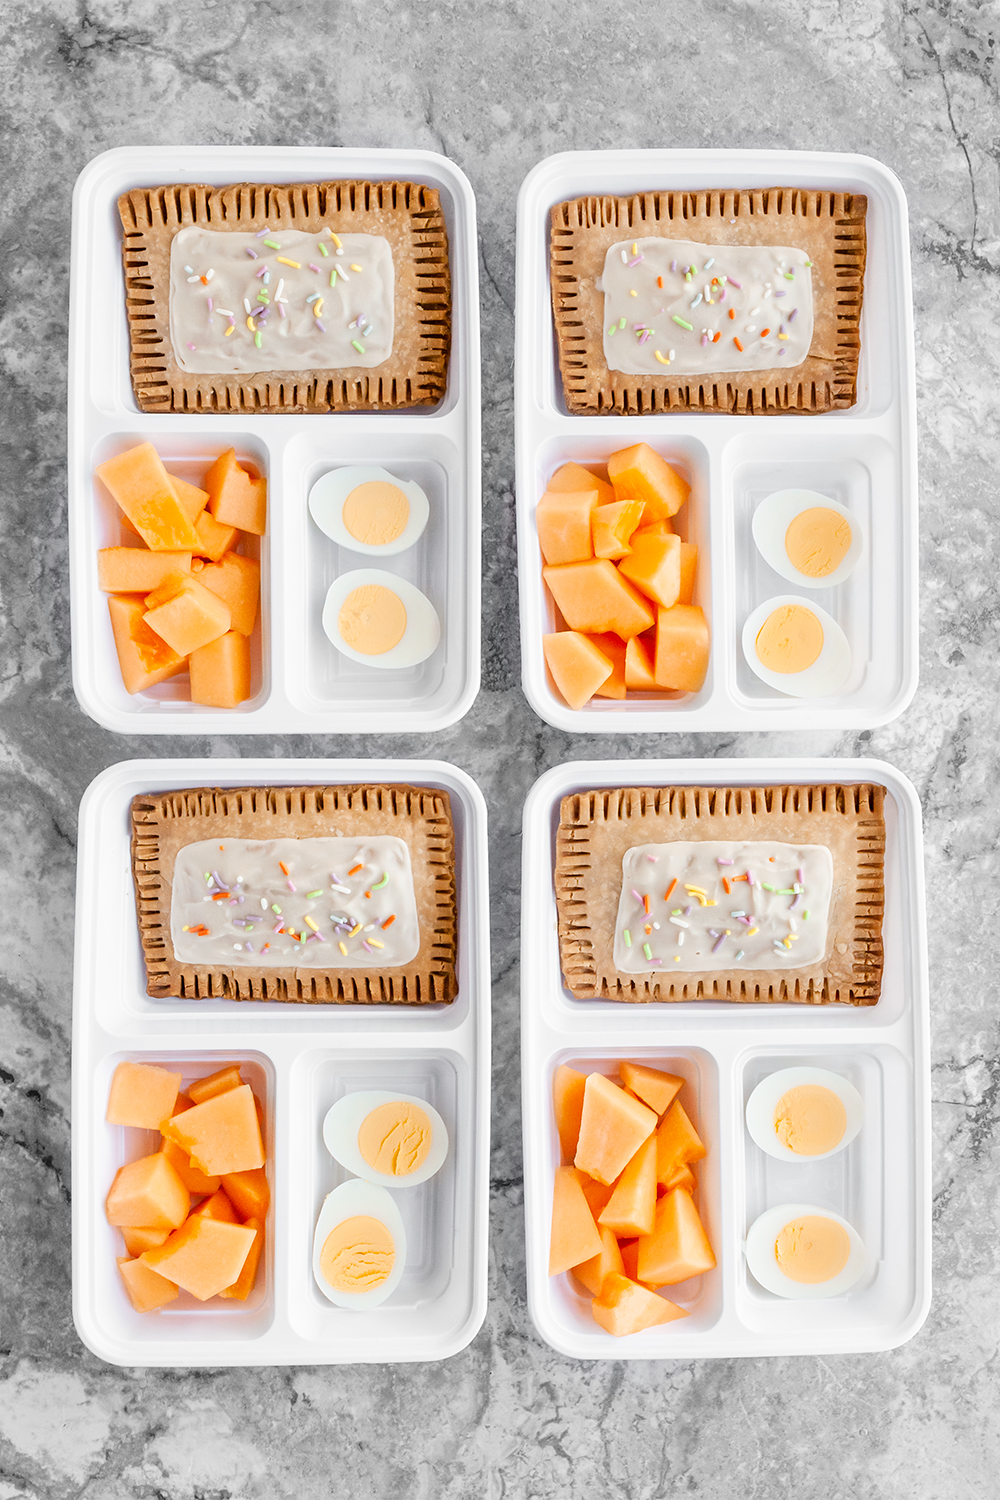
If you store your pop tarts on the counter in an airtight container, they can last a couple days. However, we recommend these 3 compartment meal prep containers so you can add the hard-boiled eggs and melon for a perfect quick breakfast, and store them for up to a week in the fridge. Just grab one on the go in the morning and enjoy it as a breakfast, brunch, or midday snack. Your will love these sweet, sprinkly, frosted, fruity, flaky pop tarts and they might just clean up the whole batch before you are able to save yourself one! Enjoy Gluten-Free Healthy-ish Pop Tarts warm or cold. If you would like them warm, just pull them out of the fridge, place on a paper towel and warm in the microwave for 20-30 seconds.
Can Gluten-Free Healthy-ish Pop Tarts be frozen?
Yes, Gluten-Free Healthy-ish Pop Tarts can go in the freezer. If you plan to freeze them, leave off the glaze until you reheat them. The frosting on these is not hard like the kind used in your traditional pop tart. If you were to put them in the toaster to reheat, you will have a melted mess in the bottom of your toaster. To freeze your pop tarts, put the frosting in a little container on the side and add it after you reheat. To reheat the frozen pop tarts, toast them in a toaster, toaster oven or air fryer so that it can retain a bit of the flaky texture. If you microwave it, defrost it for a little while and microwave for 30 seconds. It will have a bit of a softer texture when you reheat in the microwave.

Gluten-free Healthy-ish Pop-Tarts Ingredients:
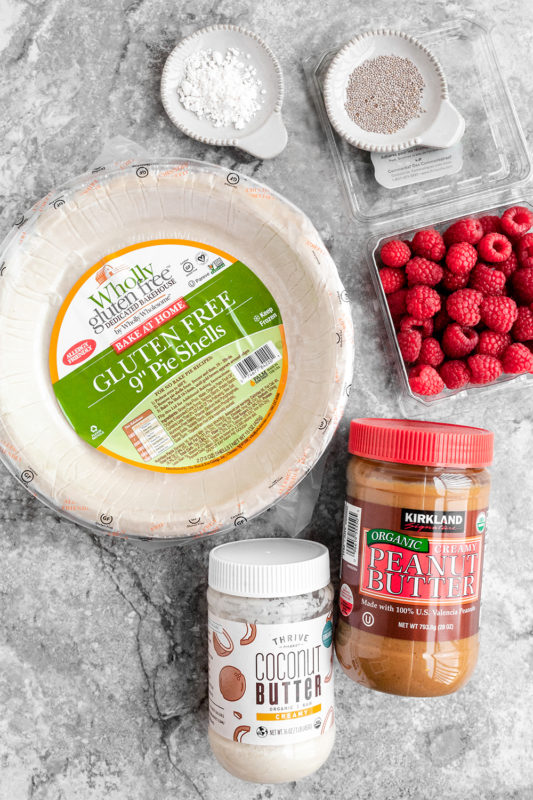
- 2 Frozen Gluten-free 9" Pie Crust Shells, removed from foil pie dishes and combined into one ball of dough
- 6 Hard-boiled Eggs, halved
- 1 Cantaloupe Melon, cubed
- ¼ C. Peanut Butter
- ¼ C. Coconut Butter, melted
- 6 oz. Fresh Raspberries (~1 pkg.)
- 3 Tbsp. Powdered Unbleached Cane Sugar
- 1.5 Tbsp. Chia Seeds
- 1 tsp. Pure Vanilla Extract
- Small bowl of water
- Gluten Free All-Purpose Flour (for rolling out pie dough)
Optional Decorations:
- Naturally Dyed Sprinkles
- Freeze-dried Berries, crushed
- Natural Food Dyes
How Do You Make Gluten-Free Healthy-ish Pop Tarts?
This recipe is not a super quick one...it takes a bit of prep, so it might be a good idea to double the batch and save some for later. Plan at least 90 minutes for the complete recipe. To keep it simple, we're using pre-prepared pie crusts, rather than homemade. If you have a favorite gluten-free pie crust recipe, feel free to use that instead.
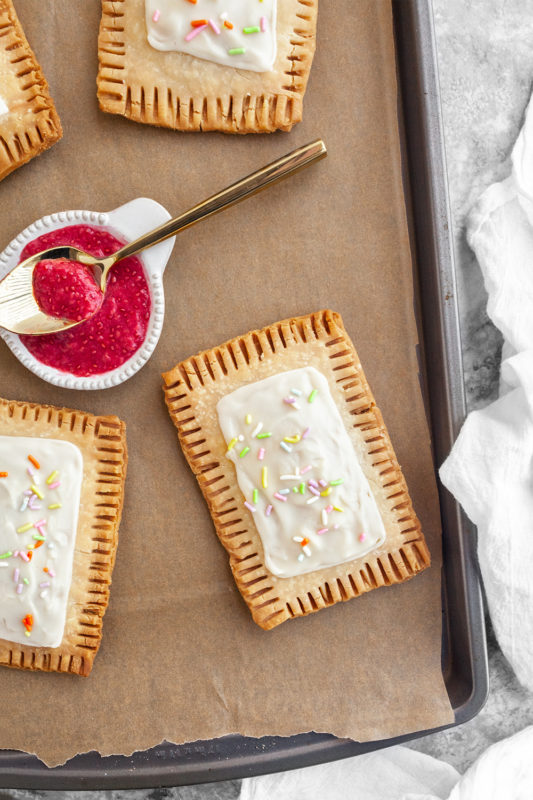
The first thing you want to do is make the berry chia jam, then preheat the oven and line a baking sheet with parchment paper and roll out the pastry and cut into 12 rectangles. Then spread a bit of peanut butter and jam on 6 of the rectangles and cover with the remaining 6 rectangles and seal edges with a fork. Bake in the oven for 25-30 minutes and place on a cooling rack and allow to cool. Make the glaze while cooling and frost as directed after they are cool (unless freezing-then leave the frosting on the side). Serve with boiled eggs and cantaloupe and store in the fridge or freezer until ready to eat! You'll love them!
How Do You Portion Gluten-Free Healthy-ish Pop Tarts?
Our recipe for Gluten-Free Healthy-ish pop tarts makes 6 pastries. Use 1-2 pop tarts per meal. Grab a three-compartment meal prep container and divvy up pop tarts, eggs, and melon (or any fruit of your choice). When served with the boiled eggs and cantaloupe, you will have a delicious, complete breakfast that you can enjoy all week! That is, unless your kids found your pop tart stash in the fridge and ate them all!
More Gluten-free breakfast meal prep recipes:
Try our other gluten-free breakfast recipes that you and the whole family will enjoy. There are plenty to choose from!
Other Tips for making Gluten Free Healthy-ish Pop Tarts
There are some other ways you could make these pop tarts to add some variety:
-
If you prefer to use your own homemade gluten-free pie crust recipe instead of the pre-made crust, you could do that.
-
Use some other berries, such as strawberry or blueberry and experiment with some different flavor combinations. You could also use a pre-made berry jam of your choosing if you don't want to make it homemade.
-
The glaze can be left off if desired for a bit of a healthier version.
-
Try with almond butter, or any other nut butter you like in place of peanut butter.
We'd love to hear how you like these and how they turned out for you! Let us know.

Ingredients
- 2 Frozen Gluten-free 9” Pie Crust Shells removed from foil pie dishes and combined into one ball of dough
- 6 large Hard-boiled Eggs halved
- 1 cup Cantaloupe Melon cubed
- ¼ cup Peanut Butter
- ¼ cup Coconut Butter melted
- 6 oz. Fresh Raspberries ~1 pkg.
- 3 Tbsp. Powdered Unbleached Cane Sugar
- 1.5 Tbsp. Chia Seeds
- 1 tsp. Pure Vanilla Extract
- Small bowl of water
- Gluten Free All-Purpose Flour for rolling out pie dough
Optional Decorations:
- Naturally Dyed Sprinkles
- Freeze-dried Berries crushed
- Natural Food Dyes
Instructions
- Preheat oven to 400℉ (or to temperature of pie dough package’s suggested temper-ature). Line a large baking sheet with parchment paper, set aside.
- In a bowl, mash raspberries and stir in chia seeds and 1 tablespoon of powdered sugar. Cover and place in fridge for 1 hour, or until thickened to jam-like consisten-cy.
- Using a rolling pin, roll out pie dough onto a lightly (gluten-free all-purposfloured surface until dough is ~⅛” thick and minimum of ~11”x8” in over all size.
- Using a piece of paper or clean cardboard create a 5”x3.5” template.
- Next, place template strategically onto rolled out dough and using a sharp paring knife, cut around the template to create ~4 rectangles.
- Place dough rectangles onto lined baking sheet. Gather leftover dough that was not used for the rectangles and repeat process until dough is used up and you have an equal amount of rectangles (~6 pairs/12 rectangles).
- Using a fork, poke a few rows of holes (doconto 2 of the 4 dough rectangles. Docked rectangles will be the bottom crusts, the un-docked will be the top crusts.
- Spread about 2 teaspoon’s worth of peanut butter onto docked rectangle (careful not to spread all the way to the edges, leave space to create a seal later). Follow with 2 teaspoon’s worth of raspberry chia jam - spread right on top of peanut butter layer.
- Next, dip a finger into bowl of water and lightly moisten the boarder of each rectangle and gently lay the un-docked rectangle over the filling side. Using a fork, gently press the edges down to create a seal.
- Bake on middle rack for ~20-25 minutes, or until golden brown. Once baked, gently place pop tarts onto a cooling rack and let cool down completely.
- While they cool down, prepare the icing by whisking together coconut butter, vanilla, remaining powdered sugar — transfer icing to a plastic baggie with cut corner (smalor piping bag with a small tip. ***If using dyes, whisk dye(along with the other in-gredients.***
- Once pop tarts have cooled, pipe a rectangular outline onto the pop tart and let harden for ~1-2 minutes. Next, fill the outline with more icing (aka floodinand gen-tly spread with a knife or toothpick until evenly covered within the outline. Top with optional decorations while icing is still wet. Set aside until icing has set up.
- Serve with sides of cantaloup and hard boiled eggs. Enjoy!
- Best stored in the fridge.
Leave a Reply